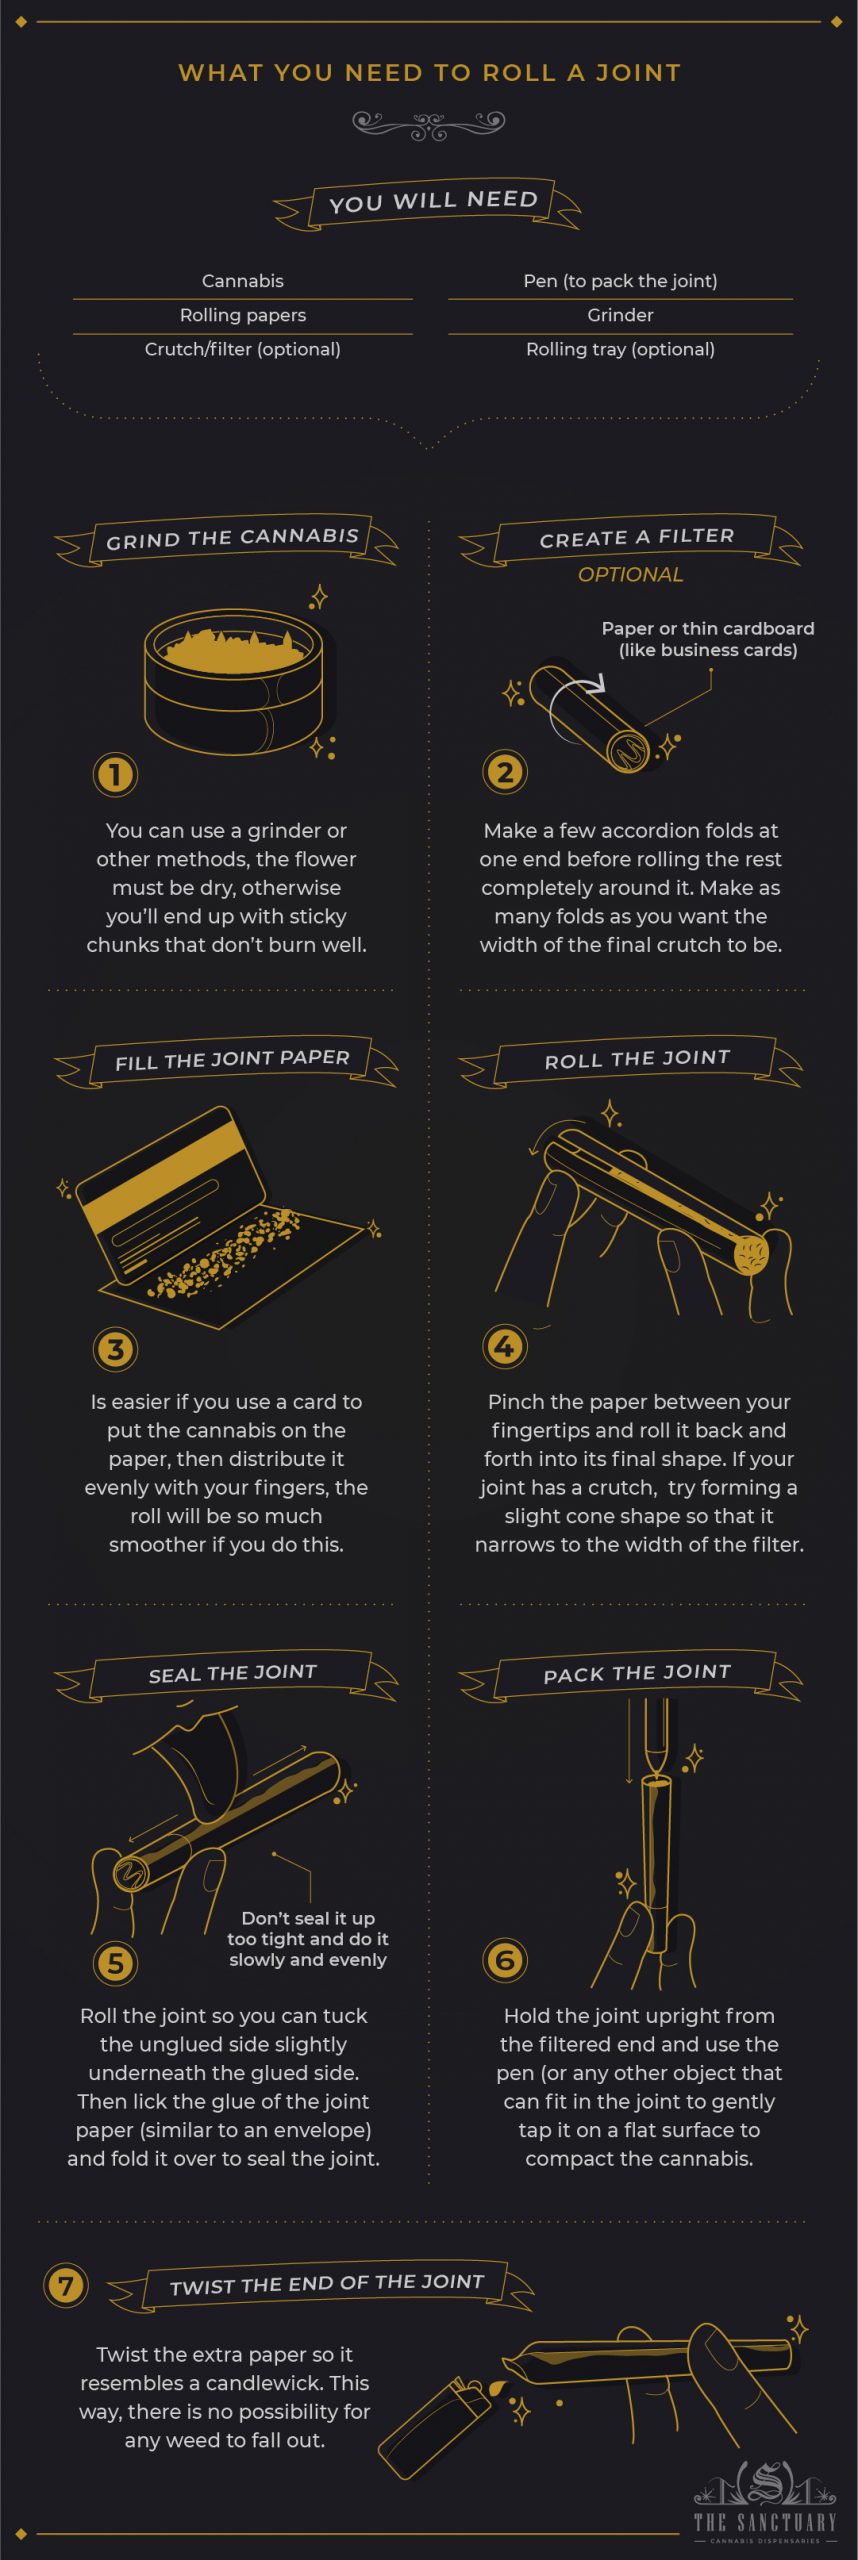
The joint is one of the most well-known methods to consume cannabis, and it’s a fantastic way to appreciate your flower’s flavor. Every weed user should know how to roll a joint. There are several ideas on how to roll one, but whatever you do, make sure your product burns evenly and gracefully.
Rolling papers come in a variety of shapes and sizes. Organic hemp papers are recommended since they are thin yet strong, ensuring that your joint burns evenly and that the scent of your strain is not harmed. They also include filter sheets, which are quite useful.
How much weed is in a joint?
A half gram to a gram may generally be held in a standard-sized paper. For a smoke circle with a few people, this is a nice amount of cannabis. Beginning with a smaller joint will make rolling easier for novices.
To give you an idea, most prerolls sold in stores are a full gram, while others come in 2-packs of half-grams. Once you have mastered rolling, you may go to king-sized sheets packed with more weed and smoke with more people.
What you need to roll a joint

Here’s a list of things you will need before we get started with the instructions:
- Rolling papers
- Weed
- Grinder
- Pen or similar-sized object (to pack the joint)
- Crutch/filter (optional)
- Rolling tray (optional)
Step 1: Grind your weed
You must first split up the buds before rolling a joint properly. The simplest method is to use a grinder, which will uniformly shred your flower. You may attempt a few different techniques for breaking up buds if you don’t have a grinder.
Before you do this, make sure your weed is completely dry; otherwise, you’ll wind up with a pile of sticky pieces that won’t burn nicely.
Step 2: Create a crutch/filter (optional)
A crutch, sometimes known as a filter or tip, is a mouthpiece for your joint. Some smokers may argue that a crutch is unneeded or optional, while others passionately advocate for it. The purposes of this filter are to:
- Assure the end of the joint remains open and unclogged.
- Prevent you from burning your fingers or lips.
- Prevent anything from falling out of the joint.
- Maintain the joint’s structural integrity.
- Increase the airflow across the joint to make smoking more effective.
Crutches can be made from thick paper or thin cardboard, such as business cards. When individuals simply form a filter into a cylinder, this approach leaves a hole that might allow cannabis to slide through or become pinched shut while smoking.
As a result, doing a few accordion folds at one end before rolling the rest around it is preferable. Fold as many times as you want the final crutch to be wide.
Step 3: Place cannabis in the joint paper
Getting the weed onto the rolling paper is one of the hardest parts of rolling a joint. If you have your pack of papers with you, use the cover flap as a flat edge to scoop up the weed and place it into the paper. If you have a wallet handy, a credit card or business card will suffice.
You could use your fingers to transfer the weed on the paper, but this is time-consuming and sticky. If you use a flat edge, you may accomplish this step in a few fast motions.
Once the weed is on the paper, carefully spread it out with your fingertips to make it fairly consistent throughout the centerfold. This does not have to be flawless, but it will make the roll much smoother.
You may do this on a wooden or plastic rolling tray to make things simpler. A smaller one with raised edges is ideal for rolling joints since it will catch any cannabis that falls out. You won’t need a table since you’ll be able to place the tray on your lap.
Step 4: Roll the joint
It’s time to roll your joint once you have filled and formed it. To pack the cannabis down into its final shape, pinch the paper between your fingertips and roll it back and forth between them. If your joint has a crutch, consider creating it into a small cone shape so that it narrows to the filter’s diameter.
For novices, this might be challenging. If you don’t want to use the filter, a symmetrical tube-shaped junction will suffice.
Step 5: Seal the joint
It’s time to shut and seal the joint once you’ve rolled back and forth sufficiently for the form to appear. Continue rolling between your fingers, tucking the unglued side of the paper beneath the glued side gently. Once the cannabis is contained, lick the glue on the joint paper (it should look like an envelope), then flip it over to seal the joint.
Tucking and sealing throughout the length of the joint should be done carefully and softly. You don’t want to close it up too tightly since it will be difficult to draw in smoke and will be difficult to keep burning. It will burn unevenly or too rapidly if it is rolled too loosely.
Step 6: Pack the joint
You should now pack the joint to achieve a smooth and uniform burn. Carefully push down the cannabis through the open end with the pen (or any other instrument that will fit in the joint). You may also re-insert anything that fell out previously or save it for a later date.
Gently tap the filtered end of the joint on a flat surface to condense the cannabis and push the crutch in for reinforcement while holding it upright.
Step 7: Twist the end of the joint
Close the open end by twisting the excess paper into a candlewick shape. There is no chance of any weed falling out this way. If you are not going to smoke your joint straight away, you can store it just like this. The twisted end will be your igniting point once you are ready to smoke.


