A singular, gigantic joint in a smoking session was a focal comedy note in many pot-based movies for many years, ever since the release of the classic Cheech and Chong movie Up in Smoke in 1978. The year 2008 gave us Seth Rogan’s Pineapple Express and from that, the “cross joint” was the new trendy thing to try.
In the movie, James Franco lifts a fat joint crossed like a “t” to his mouth and needs Rogan’s help lighting the joint with its three arms. This scene single-handedly elevated the iconic joint to another level, and with some patience and practice, you can build one too.
You will need some basic knowledge of joint rolling, as the cross joint is the same technique but applied in a more unique way. With some time and equipment, even novice joint rollers can perfect their skills and can do a cross joint.

Rolling papers
Quality rolling papers are key in constructing any joint. Papers can vary in shapes, sizes, colors, flavors, and materials, which unfortunately can create a variety of durability as well.
If you ever had a good-looking joint fall apart before lighting it, you know the pain of using low-quality rolling paper. It may be daunting to find the right paper for you, but you will be highly rewarded when you find the right brand.
Grinding weed
Quality bud is always needed for a good session, but when it comes to rolling joints you also need the right consistency of flower. Using a grinder is a safe bet to provide the right consistency and amount of weed needed for your joints.
For a cross joint, you may be required to grind up to an eighth of weed to make a sufficient joint. Check your ground bud before you roll and remove stems and other pieces that might tear the papers.
Tips for rolling
- Before rolling, position the paper with the glue strip face up and away from you.
- Distribute the cannabis evenly down the middle of the paper. This will create the shape of the joint.
- To roll a cone shape, place more flower at one end of the joint.
- You can create a filter by loosely rolling a small piece of thin cardboard or a business card and placing it at the mouth end of the joint.
- Roll your joints first from the middle, working your thumbs outward to the ends.
- Ideally, joints are firm, but not too tight which prevents being able to draw smoke through it, or too loose which can be a fast and uneven burn.
What do you need to roll a cross joint?
First, gather all your joint rolling supplies. You will need the basics for any shaped joint you roll; quality papers, a good grinder, and well-cured weed. A rolling tray will help to give a perfect roll, as well as collect extra bud that spills out during the process.
All you need for a cross joint are:
- Your favorite strain of cannabis flower.
- Grinder of any size.
- Full-size rolling papers.
- Small rolling paper.
- Paper clip, pin, needle, toothpick, earring, or another similar object.
- Scissors.
- A friend to help light the extra tips of your finished cross joint (optional).
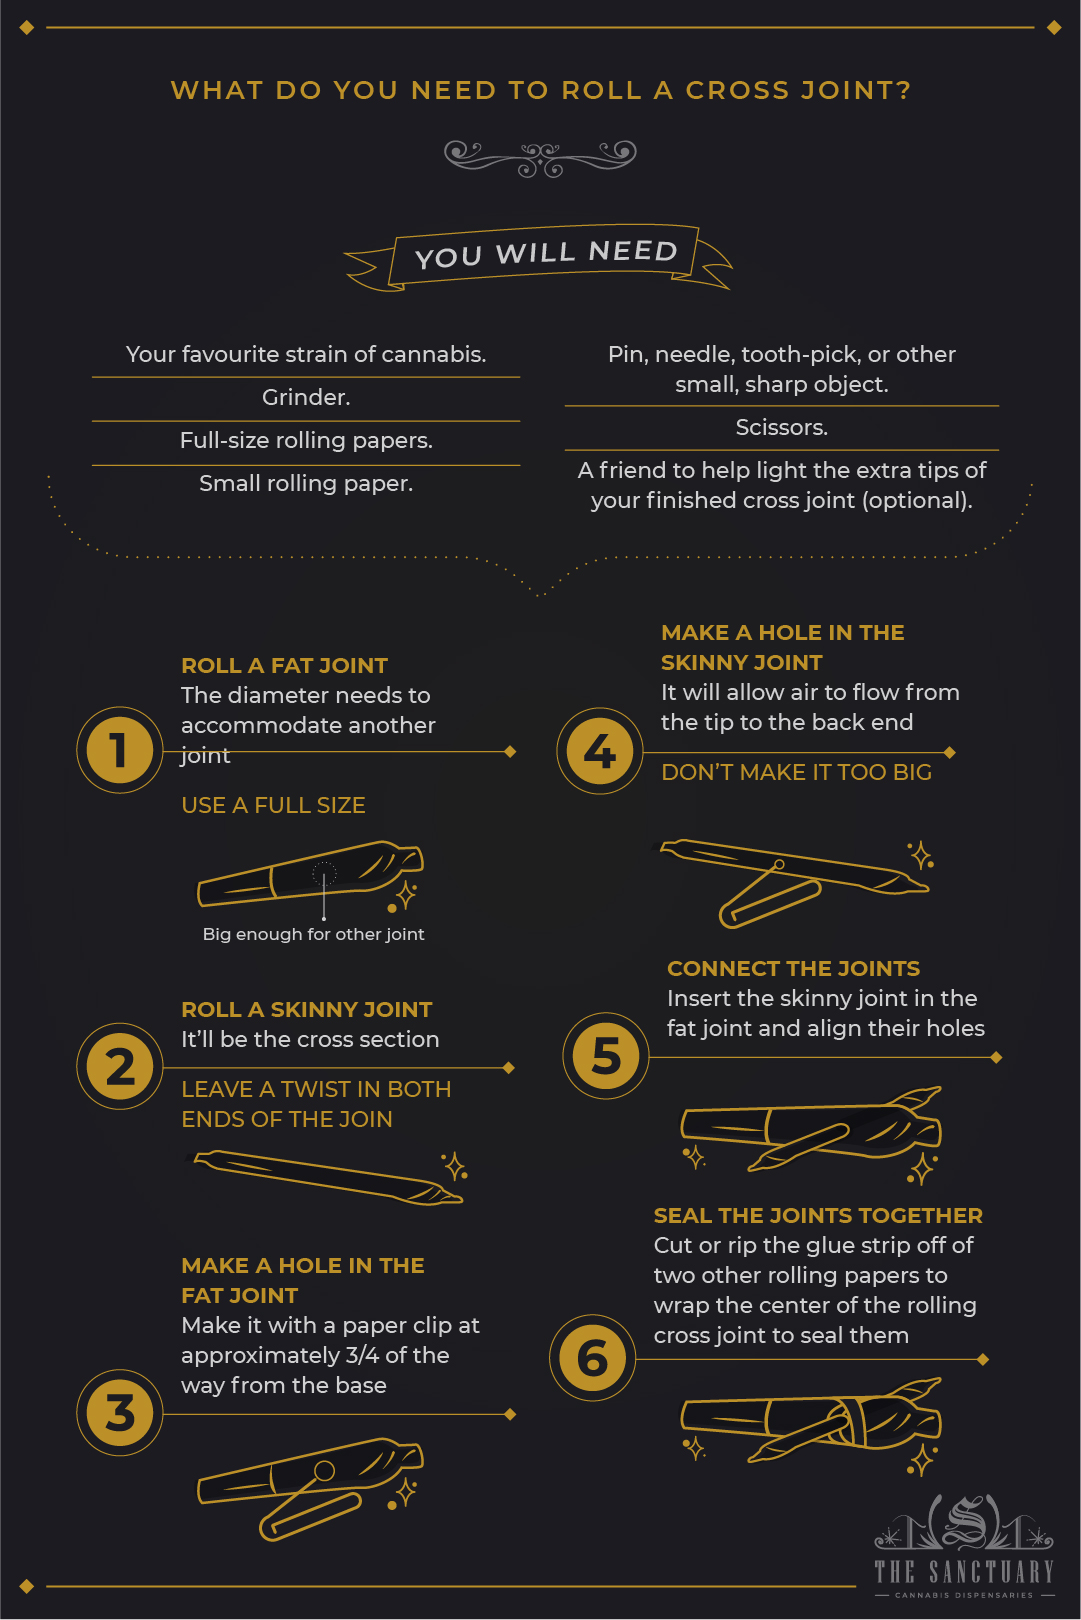
Step 1: Roll a large base joint
The first step to constructing a cross joint is to roll a larger joint to serve as the base of the cross. Grind plenty of your preferred cannabis strain. Your goal is to roll as large a joint as you can, which will make building the cross easier.
Since this is the base joint, you will build your second joint from the measurements of this one. The second joint will be jammed perpendicularly through this joint, creating the t-shape. Make sure the base joint is large enough to accommodate the next steps. For reference, the thickness of a marker is a good minimum estimate.
Lighting your joint will be easier if you leave some empty paper at the end of your joint. Seal this end up in a twist after it is rolled.
Step 2: Roll a smaller “cross” arm
The next joint you roll will be smaller in diameter and will serve as the “cross” part. It may be tempting to roll another huge one, but assembly will be a mess if you do.
Finish both ends of this joint with empty paper twists, as this joint is lit on both ends.
Step 3: Make a hole in the larger joint
When both joints are rolled, grab your paper clip, needle, or pin. You are going to make a hole all the way through the larger joint first, approximately a third of the way down from the end that you would light.
Start the holes small, and carefully enlarge them until it is just a tiny bit smaller than the diameter of the second joint. Do this slowly, making sure not to make the holes too big or your joint will collapse.
Step 4: Make a hole in the smaller joint
The holes in the smaller joint are not for construction but instead are for airflow. These holes allow the smoke to travel through all three lit ends and into your mouth. These holes should be slightly larger than pin-sized, but nowhere near the size of the holes in the first joint.
Make these holes halfway down the length of the second joint.
Step 5: Connect the two joints
Now to assemble the two joints together; carefully holding both joints in your hands, you are going to insert one end of the smaller joint into the hole of the larger one. You will want to align the holes in the smaller joint so that they are pointing towards the ends of the base joint.
Gently pull the small joint into place through the holes of the larger joint, stopping when the arms appear symmetrical.
Step 6: Seal the joints together
You now have your cross joint! To secure your joint, cut off a strip of glue from an extra rolling paper. Wrap the cross-section of your joint diagonally, trying your best to seal everything for a smooth, powerful smoke.


