Just about any recipe you can make at home is bound to be delicious, and edibles are far from the exception. Chewy, fudgy weed brownies are the stuff that dreams are made of, infused teas are both delicious and nutritious, and weed gummies are hard to not eat in one sitting (but seriously, don’t eat them all at once).
As easy as they are to eat, you might not have guessed that weed gummies are just as easy to make. But they are! In fact, the only thing standing between you and gummies you have to label separately from your vitamins, is some weed, gelatin and about 2 hours of your time.
Different Types of Edibles
Of course, weed gummies are not the only edibles there are, but they are definitely among the easiest to make outside of weed teas. That is actually the beauty of edibles in that the options you have are practically endless and they come in such a wide variety of both foods and drinks.
Infused seasonings have even been making their way to store shelves over the last few years (move over, Lawry’s), so not only have there never been more options for edibles to buy, but it has never been easier to make them.
How Can They Hit Faster?
The same way you make any strain hit faster or hit ‘more’ with a single hit: increasing the THC. Using a strain with a higher THC count will give more of the good stuff in every bite (or gummy) and have the effects last longer. Should you not have a stronger strain at the ready, you can optionally drink a cup of coffee or green tea, as caffeine increases metabolism which will help the THC hit your system faster: same thing if you eat edibles on an empty stomach.
Science is fun when there is weed involved.
How to Make Weed Gummies

To begin your next edible journey, it should always start with decarbing your weed (for the purpose of this recipe. You can make gummies even faster by simply adding a tincture to your gelatin mix, effectively deleting Steps 1 and 2). This recipe calls for making a canna oil from scratch, which is not complicated at all and can be used for many more batches or recipes.
In short, if you have ever made Jell-O or infused something, you basically know how to make weed gummies. The foundation is there, so let’s fill in the blanks.
Tools and Ingredients
Special mixers or elaborate, expensive kitchen tools are not required. You will only need the mold of your choice for shaping the gummies, along with a baking sheet and a saucepan or two.
Ingredient-wise, this is literally the entire list:
- Water
- Coconut Oil
- Gelatin
- Soy Lecithin
- Weed
Hard to get easier than this (in terms of snacks), so once you have your less-than-half-a-dozen ingredients, you are ready to preheat the oven and get cooking.
Step 1: Decarb the Weed
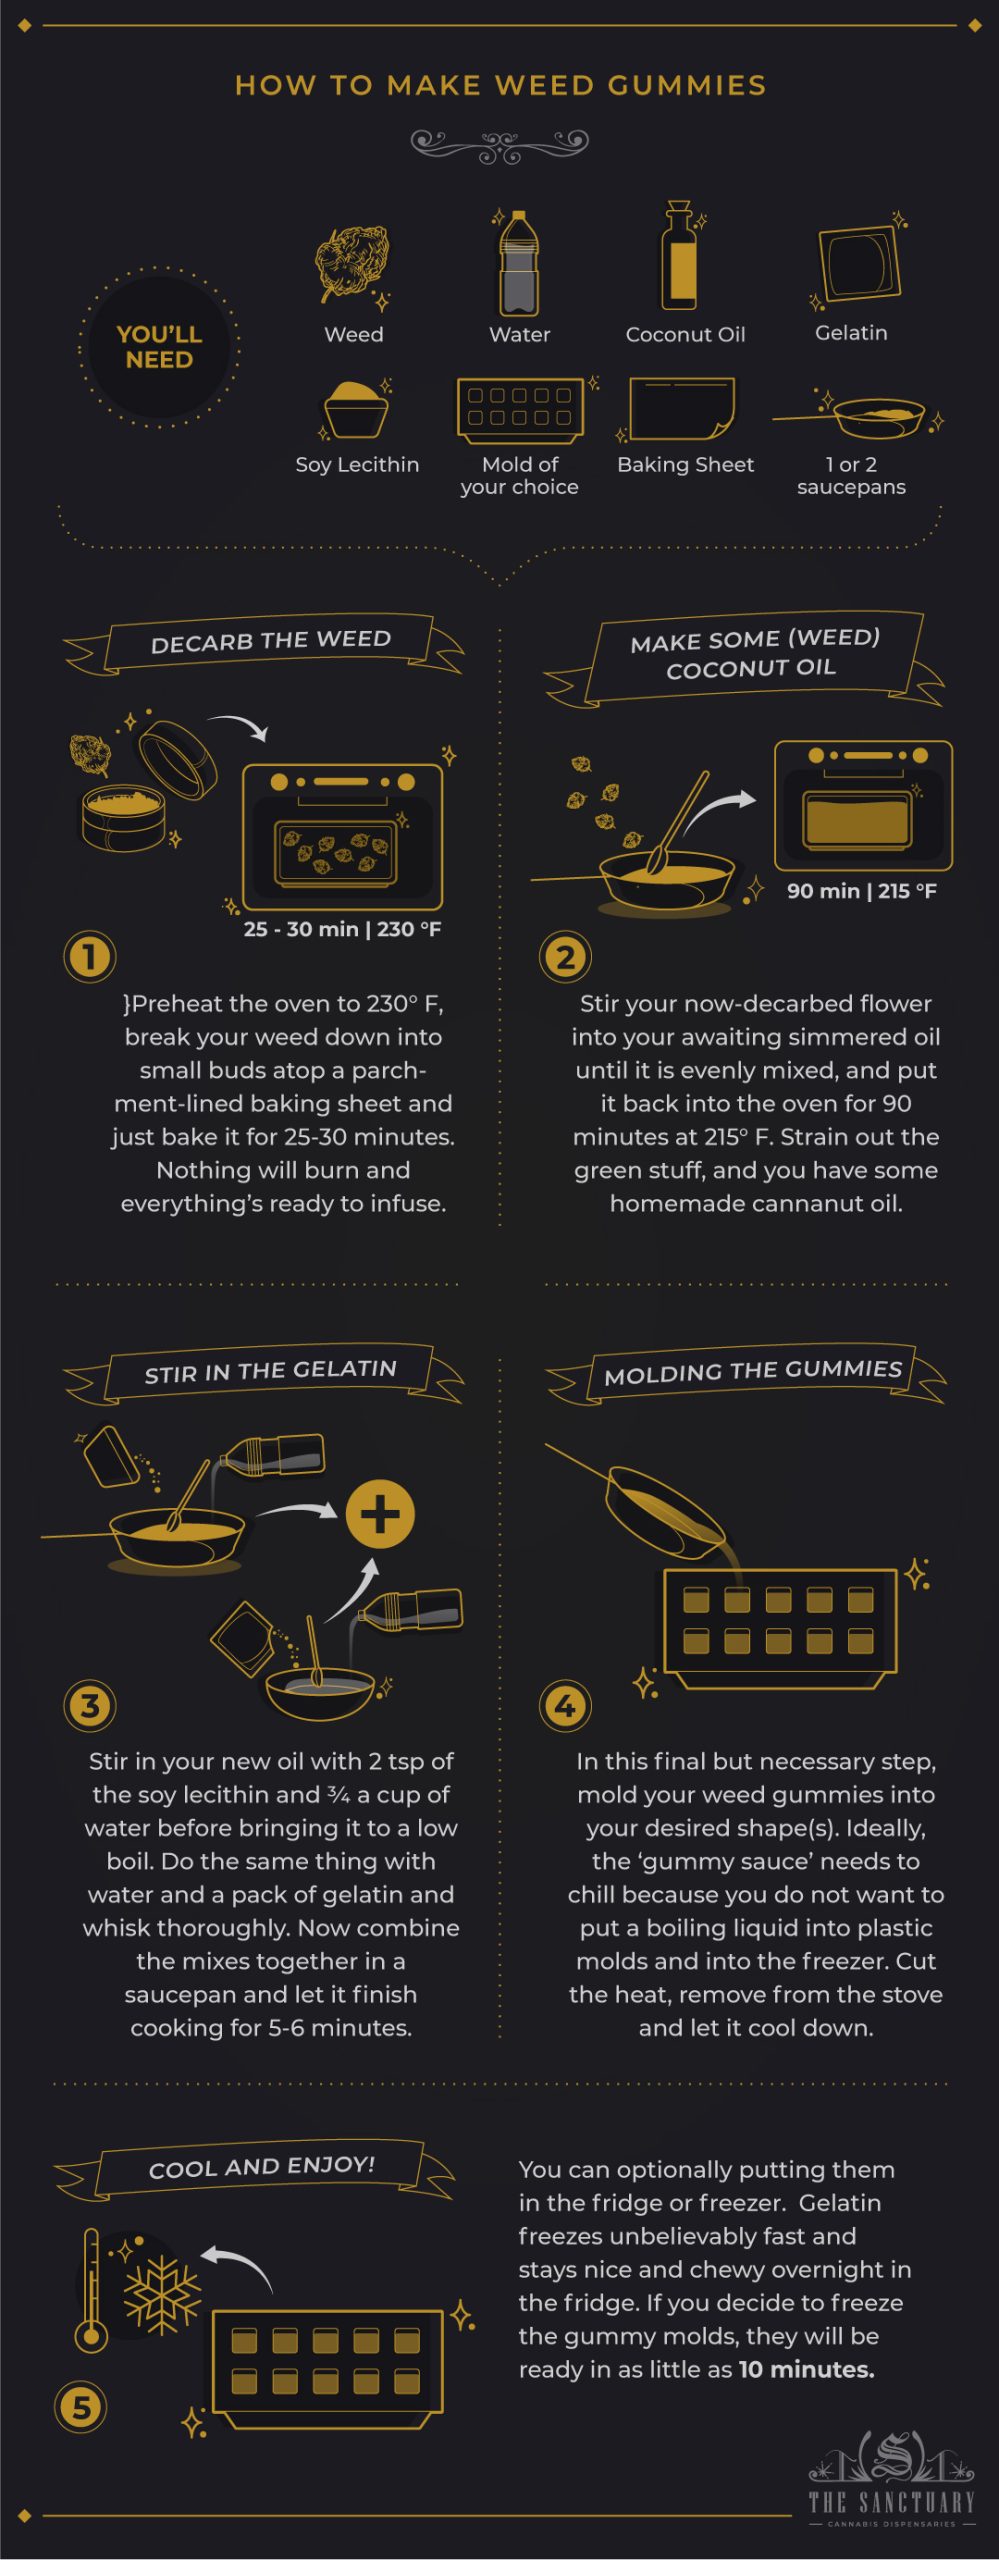
We have covered how to decarb weed in some of our previous recipes, but the Sparknotes version is: Preheat the oven to 230° F, break your weed down into small buds atop a parchment-lined baking sheet and just bake it for 25-30 minutes. Nothing will burn and everything’s ready to infuse.
Step 2: Make some (Weed) Coconut Oil
Speaking of infusing, the time has come to prepare your oil. You can absolutely use cannabutter instead, but oil just works better as a base for your weed gummies, lends its coconut flavor to the mix and gives them more of a glossy sheen. Infused coconut oil is also easier to make than cannabutter and it saves you a lot of time.
To make some, stir your now-decarbed flower into your awaiting simmered oil until it is evenly mixed, and put it back into the oven for 90 minutes at 215° F. Strain out the green stuff, and you have some homemade cannanut oil.
Step 3: Stir in the Gelatin
Don’t worry, you are more than halfway there. You want to stir in your new oil with 2 tsp of the soy lecithin and ¾ a cup of water before bringing it to a low boil.
Do the same thing with water and a pack of gelatin (with any flavor packets you want) and whisk thoroughly. Everything is all stirred and prepped, so now we combine the mixes together in a saucepan and let it finish cooking for 5-6 minutes.
Step 4: Molding the Gummies
In this final but necessary step, mold your weed gummies into your desired shape(s). There are special molds just for this that are built like ice trays but cut into fun shapes like bears or leaves.
Ideally, the ‘gummy sauce’ needs to chill because you do not want to put a boiling liquid into plastic molds and into the freezer. Cut the heat, remove from the stove and let it cool down.
Step 5: Cool and Enjoy!
The second ‘cooling’ step is optionally putting them in the fridge or freezer. Luckily, gelatin freezes unbelievably fast and stays nice and chewy overnight in the fridge. If you decide to freeze the gummy molds, they will be ready in as little as 10 minutes.
Freezer or Oven?
A reasonable question about how to properly cook weed gummies is choosing between the freezer or oven: If you use the freezer for your gummies and not the oven, doesn’t that skip activating the THC? Thankfully, no. If you see the recipe above, the first step is decarbing your weed. This is where you get what you came for in an infused recipe (or weed, in general), so as long as that necessary step is taken, anything afterwards is up to you.
But, making them in the freezer would definitely be the faster method since ovens generally cook slowly and require time for food to cool down, but you do get a chewier product this way.
Which one lasts longer?
Whichever method you decide to make them, the absolute best way to get your weed gummies to last is putting them in the freezer. Like most edibles, this will not affect the taste or the potency if they are stored properly and they will last much longer here than in the fridge.
Once the gummies are done, they will last over a month in the fridge but up to 6 months in the freezer. Just be on the lookout for weird smells or tastes to make sure they are not spoiled.


